Sunday, February 24, 2013

Brother PE770

Well, I got a new toy!!! 

I must admit I am a bit spoiled when it comes to gadgets and machines!!!  So much so I feel a little guilty (just a little, tee hee)  You see, all I have to do is tell my dear hubby that I have a coupon for something and he will be like ..."go ahead and get it then". He's such an enabler and I love it!!  Shout out to the best hubby in the world, my Keith!!!

Okay so I just got the Brother PE770 Embroidery Machine. The set up and first embroidery all took about a hour. Pretty easy so far. I know how to sew, so I may have had an advantage over someone just starting out with some of the terminology and set up. I did keep looking for the foot control pedal that comes on your sewing machines though.  There isn't one on this embroidery machine. That kind of threw me a little.

Here's my very first embroidery design. I didn't have all the right colors so I substituted.  I think it came out okay. I still have a lot to learn and I hope to incorporate this into my other crafting. Maybe I can learn how to embroider on my cards!!!  Wouldn't that be fun???

Monday, February 18, 2013

Coke can jewelry

Hello, it's Danita from danitasdesigns.blogspot.com. 
This month's project is jewelry I made from a coke can. Recycled, if you will.
Really easy project.  Coke Zero is my abosolute favorite drink!!! So I figured I might as well do something with all the cans I have left over. Just punch a hole in the coke can with your scissors, then cut around until you get a flat panel.  Be careful,edges are sharp at this point.


 Next, choose your die. I chose this one because the ornaments look more like earrings and a necklace. Don't worry about your dies getting dull, from my research cutting thin metal actually sharpens your dies.
 
For this project I am using my brand spaking new Craftwell Ebosser!!!!  You have to get this machine!!!  It's awesome!!!  No more cranking!!!
 
I love how the Ebosser takes the guess work out of what plates to use with what dies.
 
The bundle for HSN comes with everything you need to get started.  This bundle cam with a magnetic sheet for die placement. It keeps your dies from moving around while you are cutting/embossing. Fabulous right?  Here I used repositonal tape to hold the coke can down, dies underneath.
I love how the ebosser just pulls everything through, again...NO CRANKING!!!  Which I love because of my carpal tunnel.  And it stops on it's own!! From what I read it has like a 1000 pounds more pressure than the Cuttlebug.
 
When you finish, just punch out the pieces. Your edges are no longer sharp and they are embossed as well.

I punched holes in the top with a small embossing stylus and a metal piercing mat, but you can use any type of mat for this.
 
Here's the pieces with the holes punched in the top. You can double the pieces and glue them together if you want your jewelry more weighty.  They are really light weight.


Add earrings hooks,jump rings and, of course....BLING!!!
 
I hope you enjoyed reading this turorial.  I really had fun making this jewelry. It's quick and easy.  Give it a try.


Friday, February 8, 2013

Scalloped Birthday Card

My DT project this month for http://shesasassylady.blogspot.com/ was inspired by a technique I learned at the Stamp Show this past weekend in Atlanta. I don't stamp, so this was a real challenge for me.  I told myself I was going to the Stamp Show (first time ever) to try to get ideas and learn different stamping techniques. I didn't have enough time to go to each vendor to learn the different stamping methods, but I will share with you what I did learn. This is stamping and coloring on Vellum. On this card, I did the flowers.
I took this picture outside so you can really see the Vellum and embossing
 
Here's the step by step instructions for this card

First, the flowers:
 

 The card: ( Cardstock is from DCWV "The Green Tea Stack".)


I'm still trying to learn this method and hopefully by the next time I post for the Design Team, I will have mastered it!  Thank you for looking.

Wednesday, February 6, 2013

Heirloom Stamp Show cont'd (Megamount)

Again, I want to emphasize that I am not (or was not) a stamper but I sure as heck plan on becoming one after buying all this stuff.  It;s a good thing I didn't go back the second day. There's no telling what kind of damgae I would have done. This thing below is called a Megamount!.  It's a 6 x 6 acrylic stamping block. Why on earth would I need this, you say? Because Sonya G told me I did!!
They had so many background stamps to choose from.  It was overwhelming to say the least. Well, not for Sonya, apparently she knows exactly what to do with them cause she bought a truckload!!!   Just kidding, but she did buy quite a few. I got 3 stamps, 2 are tree images and one is called Scribbles.
I have no idea what I'm going to make with these but I'll be sure to post them here when I do!!
 
That's it for now, except for my Heartfelt Creations purchase, which I'm not gonna post because I'm sleepy now.  It was just a leaf die though. 


Tuesday, February 5, 2013

Heirloom Stamp Show cont'd (Cuttlebug Metal Plate)

I ate lunch at the stamp show with Sonya G, Debra M and Uneta B.  Uneta B took it upon herself to pull out this strange looking metal plate to show us.  She said it is used to make deeper embossing impressions with your Cuttlebug ( yeah right!) . After lunch, Uneta ushered us over to see the demo with  Helen. Now Helen is an Americanized Asian woman who is funny as heck. She was up against some real Trojans in the comedy department though.  We could barely get through the demo!! In the end, she said we were the best class she ever had and gave us hugs!!

On to the Metal Plate. Helen embossed 3, yes 3 sheets of cardstock at one time!! See? (look below)
 This is the 3rd sheet. You can see the embossing is crisp. The other sheets were as well. She gave us a printout of the stacking order of the Cuttlebugs plates to use with the metal plate. The above was embossed with Plates A and C along with the metal plate and a Darice folder,
This metal plate also allows you to get great impressions/cuts with your thinnest dies. Of course I had to buy one. Thanks Uneta!!!
 

The glue!!!


I was completely sold on this glue at the demo. Not just because it comes with a brush to make the application more accurate, but when Helen told us the story of how she sealed up her cracked windshield with it, I was sold!!!  I started to buy a whole dang case!!! (We break a whole lotta stuff in our house)  I'll let you know how good it is after I've had a chance to really use it.

I also bought some metal sheets for embossing and cutting, now that I have my trusty Metal Plate and a peacock die. It's really thin. I can't wait to try it!! Helen cut a beautiful filigree butterfly using the metal sheets and metal plate.

3-D

 I don't know what to call these things so I'll just call them bubbles. The kit contains the bubles, cards and envelopes.
 
Helen used foil stickers to create this beautiful cards. I'll post about these too, once I try them.


Check back tomorrow to see the Megamount!

Monday, February 4, 2013

Heirloom Stamp Show (pics)

I attended the Heirloom Stamp Show this weekend in Gwinnet County. First of all, I know me mentioning Gwinnett County will not mean a darn thing to most of you, but for those that know me, it's a major feat!!!  I don't usually ventured outside the county I live in, Cobb, and Gwinnett County is about an hour away AND I drove by myself !!!!

Okay now on to the good stuff. Let me point out that I do not stamp!!! Well at least I didn't...until I attended this show. I picked up a few techniques and spent waaaaaayyy to much money. It was a 2 day event but I only went for one day, due to the distance. If this show comes to your town, please try to go both days. I didn't even get to see all the demos at the different booths.

I learn a few more things about my cuttlebug (which hardly ever gets used) and I might have fallen in love with it again (we will see) like how to get a deeper impression.  I'll share that info with you too tomorrow. I also purchased the Megamount 6 x 6 acrylic block and 3 stamps, thanks to my friend Sonya G, who is absolutely fabulous at enabling.

OMG!! Then there was the Heartfelt Creations booth, I could just stay in that one section all day.  I had a coupon for them so you know I had to use it!!!

Be sure to check out my blog post on the 8th.  I will post my very first stamped Vellum flowers.

During this entire demo, my fellow crafter M'Liss W. was all in my ear saying "we need this!" I was only going to buy the ink pad, perforating tool and the Vellum sheets, but nooooo M'Liss said that didn't make sense and it would be more economical to buy the whole kit!!!  "You get the embossing powder with it!", she said. Geesh, I'm so weak!!

Here's the kit I purchased that is going to make me become a phenomenal stamper!!!  (yuk, yuk)


This kit cost me $85.00, but wait......it has over $100.00 worth of stuff in it (at least that what they told us) We're just suckers for good deals!!
 

Contents:  Acid free white ink
                 Re-inker
                 Super fine embossing powder
                 25 sheets of heavy Vellum (8.5 x 11)
                 Embossing mat ( to create raised relief with stylus tools)
                 Piercing/Perforating Mat
                 3 blade perforating tool (for intricate cuts on Vellum)
                 Magnetic steel grid with 1mm holes (use to emboss dots or pierce holes on Vellum)
                 Fancy flower stamp
                 3 pc  pc. softgrip stylus tools
                 Single needle piercing tool
                 Clear clamshell case for storage
                
The instructor showed us how to stamp on Vellum, heat emboss and color with blending tools and markers. We also learned how to get a dotted pattern on Vellum. When I try this method, I will update my blog with pictures.
              

Close up of perforating tool

Here are a few pictures from this vendor, sorry about the quality but I was tip-toeing to take them. lol!!

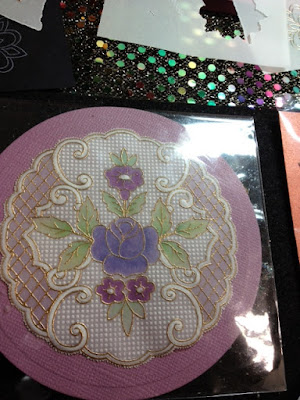
Die cut with hand colored Vellum underneath, The doily above the picture is also Vellum that has been colored.

Butterfly die cut with colored Vellum underneath, heat embossed frame

Dotted vellum and Raised Relief
 

 Do you see all the stamps in the background?