Friday, August 29, 2014

More Napkin Cards


Okay so I'm addicted! Lol!!!  These are fun to make! 
One napkin, different look.  One has a pink border and the other has a red border.
 Inside

Sunday, August 17, 2014

Get Well Card

Here's a card I made for a friend that had surgery. All cuts are from the Silhouette Store.

Thursday, August 14, 2014

Another Napkin Card (glue stick method)

Here's another Napkin Card I made.  You might say I'm a tad bit addicted to napkins now. Last week,  I used #Modge Podge with the napkin to make a card.  This time I tried a different method...... a glue stick! Yep, Elmer's Extra Strength glue stick.  I did make sure it said "permanent" on it though. I cut out the "Love" with my Cameo and added some bling. Again, really simple, that's me!!! lol

I also let this card sit for about a week and half, and then tossed it around a little, to make sure the napkin stayed adhered to the card stock. Happy to report, so far so good.

 Glue the napkin cut out to white card stock and trim away the excess.  Make sure you coat the card stock very well.

 Then I added the flower to some purple card stock and finished it with a bow and some bling.

Finished product

Thanks for stopping by!!

Friday, August 8, 2014

Napkin card

The latest craze is now the Napkin Card.  It is simply, as stated, greeting cards made with napkins. I have seen some beautiful cards made with this method and thought I would give it a try but I had 2 challenges:
1. Finding decent looking napkins and
 2. the videos I watched were much too complicated/time consuming for me and
  AIN'T NOBODY GOT TIME FOR THAT!.

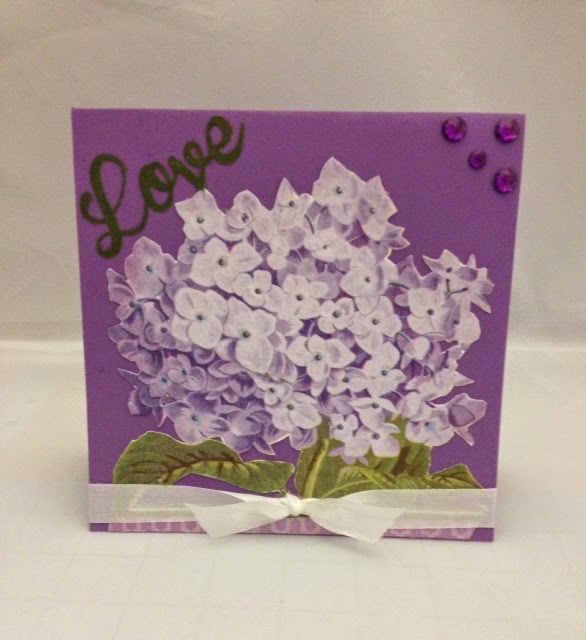
I set out to find my own method, quicker and easier (to me anyway).  Here's the 1st card I made:
and here's how I did it:                        
  Select your napkins
Then separate the layers. Most will have two or three layers
Cut out the portion of the napkin you want as the front of card, in this case, I wanted the front and the back of the card to be covered  so I opened the full napkin and then I cut a piece of 12 x 12 cardstock in half. (keep both pieces, I'll tell you why shortly)
 Lay your napkin over the card stock, leaving at least 1/4 edge all around then trim away the excess.
I used the Sparkle Modge Podge . Side note....I won a huge basket of every type of Modge Podge made at the Michaels Gold  Card event ( held years ago) and now I can finally use some. I have enough #Modge Podge and acessories to last me the rest of my life! Okay back to my post, I rolled the Modge Podge completely over the full length on the card stock, then carefully place the napkin on it.
 I let it set for a few minutes (dries fairly quick) then I used my ATG gun around the edges to secure the napkin, You don't have to, I just suck at trimming! lol 
This is why I think you need the other half of the card stock. The Modge Podge made the napkin top a little filmsy ( I may have put too much down) and I like my cards sturdier so I attached it to the card base.  Press the two pieces together firmly to make sure they stick. 
I like using the Modge  Podge because it gives the napkin a 'canvas-like' feel and is really pretty
Here's the front and back of the card.
 I added a little glitter to front just because I like bling!
Close up.
Add a sentiment to the front and inside and that's it!  Simple!

Thanks for stopping by!

Wednesday, August 6, 2014

Get well card

My friend Angie is ill so I took this opportunity to make her a card using my Stampin Up Happy Healings stamp set. I stamped  and embossed the background and layered it on pink card stock. I use my Copics for the coloring.

Here's the front:
 And the inside
Thanks for looking!!!

Tuesday, August 5, 2014

Birthday Card

I made this card for my friend, Felisa.  When I saw this stamp, it reminded me of her so I knew I had to have it.

My coloring sucks but I still love the stamp and the sentiment. I hope she likes it.

Monday, August 4, 2014

Calling Cards and Etc. from my Retreat

Hello Peeps!

I know it's been a while since I posted anything but I've been a little busy and I just came back from a fabulous 4 day retreat in Alabama. The retreat was hosted by my friend Lynne. She picked a winner this time for sure! The ladies were so much fun to be with and the food was awesome!! I'll share a few pictures with you of the retreat but mainly I wanted to share some of the calling cards from the retreat. For most of the ladies it was their first time making a Calling Card but they did fantastic job. Some even made tags.

I like to post any Calling Cards I get because so many times ladies (and gents) that attend crops for the first time have no idea what a Calling Card is or it's purpose. I know I panicked my first time having to make some. I googled and googled and could not find any information.

Calling Cards are usually 3" x 3" in size with your contact info on the back.  Basically it's kind of a get-to-know-me or remember-me token you gift to other crafters at the crop. Sometimes there is a theme chosen, by the host of the crop and sometimes it's just your creative expression.

I start with mine:
Front
 Back

Sharon's CC front (so many details)
 Sharon's CC back
Kisa's CC (done with Copics)
Debra's CC (embroidered)
Carol's CC ( 3D)
Mazie's NameTags and CC
Denean's CC (frame)
Kerry's CC and gift
Cheryl mistakenly left her CC's at home, but she came through with stickers and a gift box
 full of candy! 
Diane's CC and Tag (colored with Copics)
Terri's Tag (colored with Copics)
Rhonda gift us with Wraphia (sp) Ribbon. I have never heard of it but I love it and I used it. 


Here's our gifts from Lynne:
 T-shirt 
Gift bag
Here's a picture of the group:  Southern Style Scrappers!!
Here's my gift to the group. Wine to go Cups with our logo

Here's a picture of the Inn (backside picture from the boat dock)
And here we are on a boat ride in the Coosa River

Pool with a hot tub on the side!!  Yes we got in it!!

 Craft room
There a lot more pictures but it would take me forever to upload them here and "yes" we did do some 
crafting. lol